Programming:
Website
Template from Massimo
Website Template <<-- Download it here
Credits Massimo Menichinelli
I shared Massimo's website with my students to better understand the structure needed for Fab-Academy.
Char Entities
Reserved characters in HTML must be replaced with character entities. In this link https://www.w3schools.com/html/html_entities.asp they explain how to get some simbols html will ignore, get confused with, or use it for something else. Examples:
| Result | Description | Entity_Name | Entity_Number |
|---|---|---|---|
| non-breaking space |   ; |   ; | |
| < | less than | < ; | < ; |
For more examples, check the link above.
This gitbook
I credit and thank Kyle. Thank you for your help not only setting up this gitbook, but for all your help during F.A.18.
ATtiny85 Programmer
This work is based on Brian's work that is based on Zaerc's work, if I got that right.
ATtiny44 PINOUT (Incl. Arduino PINS):
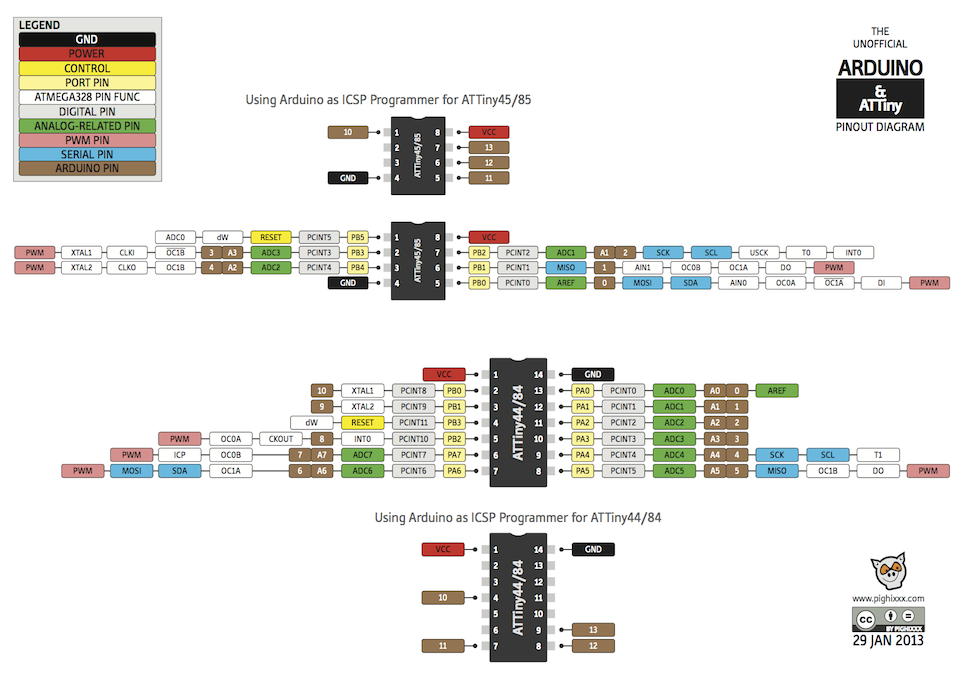
-Attiny44 (and ATtiny84), TX is on PIN PA0, and RX is on PIN PA1, as on Neil's board.
PA0 on Arduino IDE is PIN 0; PA1 on Arduino IDE is PIN 1;
With ATtinys, we can only send serial information from the tiny to your computer, but not the other way.
-Make File
Soon...
-ATtiny Serial
#include <SoftwareSerial.h>
Your Arduino IDE should already have the SoftwareSerial library pre-installed.
Here's a link to Arduino's website Software Serial.
The base code you're looking for (ATtiny44) can probably be this:
// Using an ATTiny44
#include <SoftwareSerial.h>
SoftwareSerial mySerial = SoftwareSerial (1,0);    // RX PA1 12, TX PA0 13

// Pin Configurations
const int SENSOR = A2;          // PA2
const int LED = A7;             // PA7
int sensorValue = 0;  // variable to store value coming from the sensor


void setup() {
  // declare the LED as an OUTPUT:
  pinMode(LED, OUTPUT);
  mySerial.begin(115200);
  mySerial.println("The value is:");
}

void loop() {            // read the value from the sensor every 500 ms
  sensorValue = analogRead(SENSOR);
  mySerial.println(sensorValue);
  digitalWrite(LED, HIGH);    // Blink LED for visualizing sensor timing
  delay(250);
  digitalWrite(LED, LOW);
  delay(250);
}
Didn't work? Then...
try this code instead:
// Using an ATTiny44
#include <SoftwareSerial.h>
SoftwareSerial mySerial(0,1);     // RX PA1 12, TX PA0 13 (flipped)

void setup() {
  mySerial.begin(19200);          // start serial feed, set the baud rate
}

void loop() {                     // print hello every 250ms
  mySerial.println("hello");
  delay(250);
}
Play with the Baudrates (On the Serial Monitor of ArduinoIDE) to figure out which one gives you "Hello"s. Try setting the serial baud to 19200 in Arduino and 2400 on the serial monitor to report my expectation. I've found J.travis russett's page to be helpful, though confusing.
More references: Adhitya's Fab Academy page

This work is licensed under a Creative Commons Attribution-NonCommercial-ShareAlike 4.0 International License.